Flutter is a powerful and intuitive framework for building beautiful, cross-platform mobile applications that uses the Dart programming language.
This essentially means that Flutter can be used to write one codebase for an app that runs natively on both iOS and Android.
With all the hype around Flutter and mobile app development, learning Flutter is both a valuable skill and a gratifying endeavor in its own right. However, the path to learning Flutter is a little unclear due to how new the language is.
- the language is constantly being updated (to the point where tutorials from just a few months ago are out of date)
- there are a lack of freely available, well thought out and comprehensive courses or books compared to some other more established frameworks and languages like python
This guide compiles tutorials, tips, examples (with screenshots), resources, and even an example project to help make the learning process for Flutter much easier. You can be a complete beginner, an intermediate or even advanced programmer to use this guide. I hope you find it helpful!
Note: See the ‘code’ folder in this repository for all of the code within this guide.
Getting Started
Before we get started with dart and flutter, we first need to set up our programming environment, which is what we will be using to code flutter apps.
The two main IDEs that provide the most features for Dart and Flutter are Visual Studio Code (VS Code) and Android Studio. Choosing either one is up to you, but I do have a slight preference to VS Code because it looks sick…
Vim can also be used if you have coc or native lsp and install the dart and flutter extensions.
Choosing the right IDE is essential to getting all the features that the Dart programming language provides us with. Once you have your IDE / Text Editor, make sure you install the Dart extension and the Flutter extension. With these extensions, our IDE / Text Editor will perform extremely detailed error checking, type checking, null safety checks, and formatting to make our lives as developers a lot easier.
Once you have your environment set up, let’s move on!
Learning Dart
Dart is a language developed by Google that is the backbone to the flutter framework. It is the language you will be using when you code up apps with the Flutter framework.
If you have never coded before or have less experience with programming, I recommend you take a look at this excellent tutorial from Mike Dane on YouTube (PS don’t sit through the whole thing all at once! Spend some time thinking about programming concepts in your subconscious mind while you take breaks or do other things).
With that said, here are the basics of dart.
Outline:
Variables
Variables in dart are type-checked, which means that every variable must be declared with a specific type, and that type must match with what the variable is assigned throughout your programs.
Here are some basic types and examples:
String foo = 'foo';
int bar = 0;
double foobar= 12.454;
bool isCool = true;
List<String> foobarList = ['foo', 'bar'];
Dictionaries (which map keys to values) are specificed as the ‘Map’ type in dart. You have to specify the key type and the value type, like as follows.
Map<String, int> grades = {
  'John': 99,
  'Doe': 30,
};
You will get an error if you assign an incompatible type to the same variable.
String errorExample = 'foo';
errorExample = 2; // ERROR
You can use ‘var’ and ‘dynamic’ to make a variable type dynamic, but it is usually not a good idea to do this, as it could end up in frustrating errors down the line.
Additionally, dart has a unique ‘final’ and ‘const’ operator that can be used for declaring variables. ‘final’ is generally used to declare a variable that won’t change once it’s declared. For example, if a user types in their name and we save it to a variable, we know that variable (their name) won’t change, so we can initialize / declare it like so:
final String name;
The ‘const’ keyword is a little more of a specific use case – it makes the variable constant from compile-time only. It will be useful later down the line for the Flutter framework, but for now, don’t worry about ‘const.’
Functions
Functions are declared by specifying the return type, the name of the function, and the parameters within paranetheses. Void is used to specify the return type if nothing is returned.
// doesn't return anything but still executes some code
void main() {
  print('hello world');
}

// prints 'hello' but also returns the string 'complete'
String hello(int reps) {
  for (int i = 0; i < reps; i++) {
    print('hello');
  }
  return 'complete';
}

// returns a list of strings (List<String>)
List<String> people() {
  return ['John', 'Doe'];
}
Asynchronous functions are functions that can execute different commands at the same time – asynchronously.
An example of how this would be useful is in calling APIs (basically, trying to retrieve some sort of useful information or data that was programmed by someone else, from the web). If our function calls an API and assigns a variable to the API’s response, but our entire App is waiting for that function to finish executing in order to do something, then it isn’t very efficient. If we make this function asynchronous, the function calling the API can then execute at the same time that the App allows other functions to execute, or while the App does something else.
Within an asynchronous function, if we ever need our function to wait for some line of code to finish before we continue, we simply precede the code with the keyword, ‘await’.
For asynchronous functions in dart, add the ‘async’ keyword between the parentheses and the curly braces, and enclose the return type in ‘Future<[return type]>’.
Future<String> retrieveData() async {
  String response = await someAPICall(); // assuming the api call returns a string
  return response;
}
Conditionals
If statements are simply written as follows:
bool someCondition = true;

if (someCondition) {
  print('someCondition is true');
} else {
  print('someCondition is false');
}
Loops
For loops are very important in all programming languages, and there are a few ways to implement them in dart.
List words = ['hello', 'world', '!'];

// 1st way
// declare an int i, increment it by 1 until it is no longer
// less than words.length (3 in this case)
for (int i = 0; i < words.length; i++) {
  print(words[i]);
}

// 2nd way
// for each element in word, dart will take that element (in this case, a string, word)
// and will allow you to execute code using that element (here, we just print it out)
// the rocket notation (=>) allows us to write only a single statement to execute
// on the right side. otherwise, we would do (word) { print('hey!'); print(word); }
words.forEach((word) => print(word));

// 3rd way
// very similar to the 2nd way but a different syntax
for (String word in words) {
  print(word);
}
Pretty cool!
Classes, Objects, and Constructors
Classes are essentially blueprints, or templates, for creating your own data type in your programs. For example, if you wanted to write programs about cars, it would be very difficult to do so using the primitive data types of String, int, bool, etc.
Using classes, we can create our own data types or models by defining a class, and its attributes. These attributes are of primitive data types, but the resulting class allows us to write more complex code in a simpler manner.
When we need to create a specific instance of a class (i.e. we want to use the blueprint to actually create a car), we ‘instantiate’ it with the attributes we want, and the result is called an Object.
An object is simply a specific instance of a class – the class would be ‘Car’, and the object would be something like a Tesla Model S. Another object you might create would be a Lamborghini Aventador. You can create as many objects as you want using the same class!
Classes can be created and used like this. Notice how the type of the object that is instantiated is declared, and how the object is instantiated.
class Car {
  String name;
  int price;
  bool isMadeByElonMusk;
}

void main() {
  // type 'Car'
  Car tesla = Car(); // class is instantiated with parentheses, ()
  // populating each of the attributes we defined in the above class
  tesla.name = 'Model S';
  tesla.price = 50000;
  tesla.isMadeByElonMusk = true;
}
Now, it would be very tedious and inefficient to manually set all the attributes of an object after we’ve created one. Doing tesla.name, tesla.price, …, isn’t good enough for us.
That’s where constructors come in. Constructors allow us to define a function in our class that will deal with setting all the attributes for us. Then, to instantiate a class, all we have to do is pass in the parameters. See the example below.
Another important concept relating to classes is methods.
Methods are functions defined in our class, that deal with data and perform special operations relating to our class. For example, we might want to check whether or not our car is expensive. We can do so by defining an ‘isExpensive()’ method inside our class.
Note that methods defined within a certain class have access to the attributes associated with the object it was called upon. If the ‘isExpensive()’ method is called upon our tesla object, it has access to the tesla.price value.
// define a class named car
class Car {
  // define a constructor that takes in a String name, int price and bool isMadeByElonMusk
  Car(String name, int price, bool isMadeByElonMusk) {
    // set all the object's attributes equal to the inputs passed in
    this.name = name;
    this.price = price;
    this.isMadeByElonMusk = isMadeByElonMusk;
  }
  // defining the attributes of the class
  String name;
  int price;
  bool isMadeByElonMusk;

  // defining the method 'isExpensive' that returns type bool
  bool isExpensive() {
    // 'this.price' refers specifically to the price value of the object it was called upon
    if (this.price > 30000) {
      return true;
    } else {
      return false;
    }
  }
}

void main() {
  // instantiate the class by using its constructor, passing in the expected parameters
  // we defined already
  Car tesla = Car('Model S', 50000, true);
  // returns true by using the Car class's method, isExpensive, because tesla.price = 50,000
  bool isCarExpensive = tesla.isExpensive();
}
More Dart Resources
As always, make sure you review these concepts often to get familiar with them. Here are some more resources to help you cement these into your brain that I found very useful when I was learning.
See the dart_examples.dart file in the ‘code’ folder to see all the examples from this dart tutorial.
Learning Flutter UI
Now that you know some of the basics of the dart programming language, let’s take a look at the Flutter framework.
Outline:
- Installation
- Widgets
- Layout
- Formatting
- Stateless Widgets
- Stateful Widgets
- Null Safety
- More Flutter Resources
First, we’ll install a programing environment for Flutter.
Installation
The installation process can be a bit tricky for some users depending on the OS, but it isn’t too bad. Follow these resources to install Flutter and the necessary tools for your OS (in addition to Flutter, you will also need an emulator / virtual phone in order to test your apps).
Windows
MacOS
Linux
Once finished, run this command in the terminal to make sure your environment is all ready to go.
$ flutter doctor
Create a flutter project with the following command.
$ flutter create <project_name>
The folder structure will look something like this. We will be putting all of our code in the ‘lib’ folder, and I’ll explain the other folders later in the guide. For now, just follow along with the code in the guide and don’t worry about project setup just yet.
Good job! Now that we have our environment set up, let’s take a look at how apps are laid out in the Flutter framework.
Widgets
Flutter apps are built using things called Widgets. If you are familiar with a frontend javascript framework, these are akin to components, but many come already built by the framework. Widgets are also quite similar to HTML elements like ‘p’ (for paragraph), ‘h1’ (for header 1), etc.
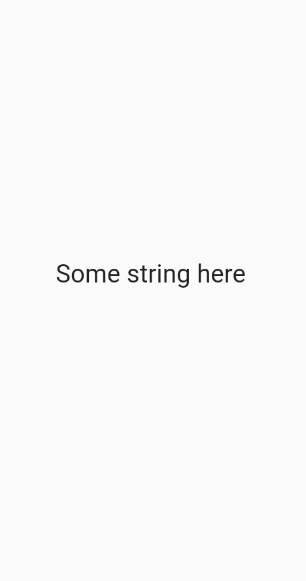
Widgets are essentially the basic elements or building blocks of an app that Flutter has created for us. They are instantiated with specific properties or parameters that Flutter is expecting from you. For example, to display text on the app screen, we use a widget called the Text widget, comparable to the html ‘p’ element, that is instantiated by passing in a string. Here’s what it looks like, in code and on an app.
// displays the text on the app screen
Text('Some string here');
There’s also a prebuilt button widget from the Flutter library called the ElevatedButton (just a Material theme button) which takes in an onPressed property (the code to be executed after the button is pressed) and a child property (the Text widget that displays the text of the button). Another one is the TextField, which handles input text.
Layout
Widgets are also used for things more complicated than just displaying text or pressing buttons. The way Flutter lays out things in the app is also done through widgets. For example, the Container widget, which is akin to the ‘div’ in html, will give us the ability to wrap another child widget in a container, in order to add padding, margins, colors, or something else. The inner widget is usually called the ‘child’ widget, and the container would be the ‘parent’ widget of the ‘child’ widget. Makes sense, right?
Container(
  child: Text('hello!' )
),
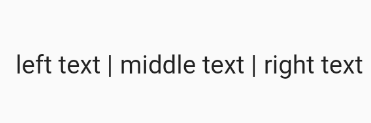
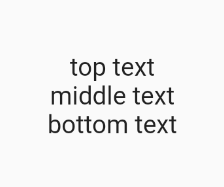
Some more important layout widgets are the Row and Column widgets. These widgets allow you to stack widgets horizontally or vertically on the screen. They are instantiated by passing in a list of children widgets. Here’s how they work.
Row(
  children: [
    // in the app, child widgets of a row are laid out left to right like so
    Text('left text'),
    Text('middle text'),
    Text('right text'),
  ],
)

Column(
  children: [
    // child widgets of a column are laid out top to bottom like so
    Text('top text'),
    Text('middle text'),
    Text('bottom text'),
  ],
)
Left: Row
Right: Column
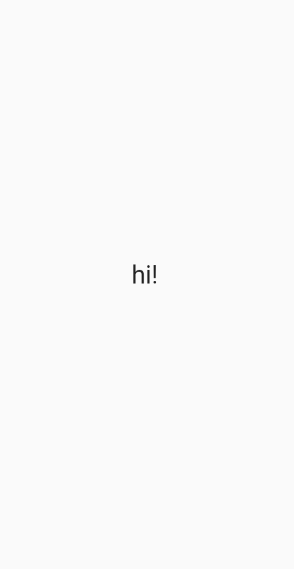
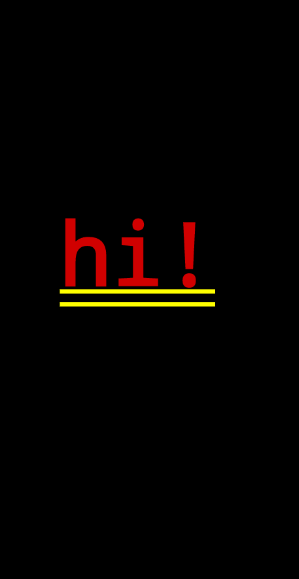
Some layout widgets are wrapped around every other widget we put onto the screen. For example, the Scaffold widget is usually used to lay out or ‘scaffold’ the screen for us, and it is used like this:
Scaffold(
  body: Container(
    child: Text('hi!'),
  ),
)
Note: the Scaffold applies basic styling to the page, like making the background color white, making the text black, making a default font size, etc. Without a Scaffold, you are basically rendering pure or raw widgets to a completely blank screen that has essentially no data or styles applied.
Left: with Scaffold
Right: without Scaffold
Another useful widget is the ListView.builder widget. The ListView.builder widget takes in two main arguments – the itemCount (how many list items to build), and the itemBuilder (which will return what is actually built). Here’s what it looks like.
List<String> people = ['John', 'Doe', 'Jane'];

ListView.builder(
  itemCount: people.length, // 3
  // index is the current index that the builder is iterating on. think of it like the
  // 'i' in the for loop,  for (int i = 0; i < whatever; i++)
  itemBuilder: (context, index) {
    return Container(
      child: Text(people[index]),
    );
  },
)
We will see later how these look in screenshots.
Properties / Parameters
Each widget built by Flutter can be passed a number of properties or parameters. As we saw earlier, the Container widget takes in a ‘child’ property, and it can also take in a ‘color’ property to define the background color of the Container.
Each widget will have a number of parameters specific to that widget that you can learn about by reading the Flutter Documentation or by using the IntelliSense of your IDE / Text Editor. For example, in VS Code, you can press ctrl+space or hover after typing in a Widget to see what properties it can use.
Usually, you can also pass in all of your styles to the widget through the parameter.
Many of these parameters only accept very specific types or objects. The ‘child’ property of the Container widget will only accept another Flutter widget. The ‘color’ property will only accept objects predefined by Flutter (like Colors.black, Colors.blue, etc) or objects instantiated in a certain way (Color(0xFFFFFFFF), one way to do it using hex codes).
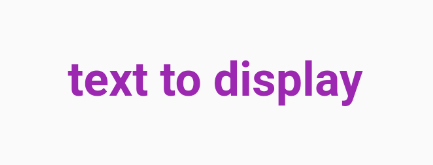
In the Text widget, we can style the text by passing in a ‘TextStyle’ object instantiated with our styles, passed into the ‘style’ property of the Text widget. Notice how the color property takes in a Color object from the Flutter library, Colors.purple. Also, the fontWeight property takes in a FontWeight object.
Text(
  'text to display',
  style: TextStyle(
    // font color
    color: Colors.purple,
    // font size
    fontSize: 16.0,
    // font weight
    fontWeight: FontWeight.bold,
  ),
)
For styling in a Container widget, we use the ‘decoration’ property and pass in a ‘BoxDecoration’ object that is instantiated with our styles.
Container(
  // styling the container
  decoration: BoxDecoration(
    // you can define the background color in this object instead
    color: Colors.blue,
    // border radius - valid arguments must be of class BorderRadius
    borderRadius: BorderRadius.circular(20.0),
  ),
  height: 50.0,
  width: 50.0,
  // margin of the container - argument must be of class EdgeInsets
  margin: EdgeInsets.all(8.0),
  // child element (using the Center widget centers the Text widget)
  child: Center(
    Text('hello!')
  ),
)

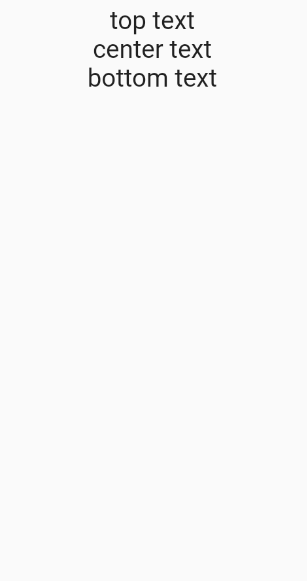
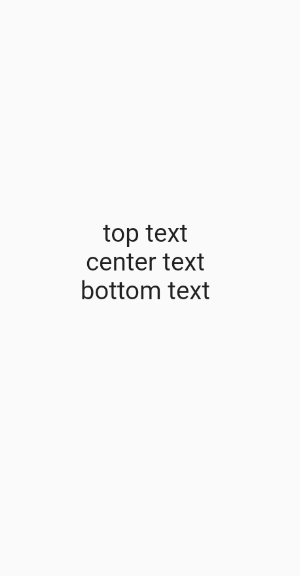
In Column widgets, you might need to vertically align your objects to the center of the page. Here’s how you could do that using the Column widget’s ‘mainAxisAlignment’ property (main axis of the column is vertical). You can also align text horizontally in a column widget using the ‘crossAxisAlignment’ property.
Column(
  // argument passed in must use the MainAxisAlignment object
  // can you start to see the practices and conventions Flutter everywhere?
  mainAxisAlignment: MainAxisAlignment.center,
  children: [
    Text('top text'),
    Text('center text'),
    Text('bottom text'),
  ],
)
Left: without MainAxisAlignment.center
Right: with MainAxisAlignment.center (as in the code example above)
Other properties of Column include crossAxisAlignment, mainAxisSize, and more. Chances are, if you feel like you need to do something to style your widget, you just need to Google the properties of that widget, or Google how to accomplish what you need to find which property to use.
The amount of properties and classes you need might seem a bit daunting to learn about, but over time it will become intuitive for you (plus, Google is your best friend)!
Formatting
Now, you might be wondering, what the heck are all these commas and new lines everywhere? The reason I’ve laid out the code like this is because of how your IDE will format your code for you. It does this by detecting trialing commas and adding corresponding new lines.
Adhering to the formatter will make your code much more readable both for yourself and for others. Here’s a simple example.
// weird code you might write totally without a formatter
// not very good, is it?
Column(children:[
  Container
  (child: Text
  (
    'hi!'
  )),
  Text(
    'hi'
  )
]
)

// code you might write with the formatter, but without adhering to the formatting guidelines
Column(children: [
  Container(color: Color(0xFFFFFF), child: Text('hey there'), margin: EdgeInsets.all(5.0), padding: EdgeInsets.all(5.0)),
  Text('hi')])

// code you write with the formatter, that adheres to the formatter
Column(
  children: [
    Container(
      color: Color(0xFFFFFF),
      child: Text('hey there'),
      margin: EdgeInsets.all(5.0),// add a trailing comma to the last parameter (margin)
    ), // add a trailing comma to the Widget
    Text('hi'), // add a trailing comma to the last child of the Column
  ], // add a trialing comma to the children parameter
)
Would you agree with me in saying that the last example is the easiest to read and the easiest to code with (disregarding the comments)?
Simply just add a trailing comma to your widgets and their parameters, hit save, and the formatter will do the rest for you. Over time, you’ll get better and better at it.
Stateless Widgets
Stateless widgets are essentially widgets that don’t change – they are static. One example of a stateless widget would be a page that displays the names of the states in the US in a list. Let’s take a look at a more simple example by creating a stateless widget that simply returns a white container. Here’s the syntax for defining a stateless widget.
class ListOfStates extends StatelessWidget {
  // this is the constructor, but don't worry about it right now
  const ListOfStates({Key? key}) : super(key: key);

  // @override is good practice to tell us that the following method (in this case,
  // the build method) is being overriden from the default build method
  @override
  // this build function returns a Widget
  Widget build(BuildContext context) {
    return Container(color: Color(0xFFFFFFFF));
  }
}
Good news – most IDEs contain snippets to automatically create stateless widgets for you! Just type in stless into your IDE and press TAB or Enter to generate all the code necessary.
If you would like to add parameters for your stateless widget (for example, making a ‘message’ parameter to pass into a stateless widget that displays that message), we need to use constructors in the same way that classes are constructed. Here’s how.
class DisplayMessage extends StatelessWidget {
  // add it to the constructor here after the key, as 'required this.<parameter>'
  DisplayMessage({ Key? key, required this.message }) : super(key: key);

  // initialize it as a 'final' variable (it won't change)
  final String message

  @override
  Widget build(BuildContext context) {
    return Container(
      child: Text(message),
    );
  }
}
This widget would then be instantiated in another parent widget like so:
Scaffold(
  body: Column(
    children: [
      ...
      // instantiating the stateless widget we just created (which is in another file)
      // with string, the message we want to display
      DisplayMessage(message: 'Hello there!'),
      ...
    ],
  ),
)
Stateful Widgets
Stateful widgets are widgets that can react to certain changes and then be rebuilt. This is useful if we want our app to be interactive. For example, let’s say we want to have a counter in our app. Whenever the user presses a ‘+’ button, we want the app to display an increase in a variable we define, ‘count’. Here’s how.
Note: whenever we want our stateful widget to react to any changes (which requires Flutter to rebuild the page), we use the setState(() {}) method.
class DisplayCount extends StatefulWidget {
  const DisplayCount({Key? key}) : super(key: key);

  @override
  _DisplayCountState createState() => _DisplayCountState();
}

class _DisplayCountState extends State<DisplayCount> {

  // defining a variable, count, inside our widget
  int count = 0;

  @override
  Widget build(BuildContext context) {
    return Column(
      children: [
        // display the count as a string
        Text(count.toString()),

        ElevatedButton(
          // the text displayed on the button
          child: Text('Click me to add +'),

          // the code that will execute when the button is pressed
          onPressed: () {
            // setState is called to signal to Flutter to rebuild the widget
            // count is incremented by 1, so the widget will be rebuilt with
            // a new value displayed in the text widget above
            setState(() {
                count += 1;
            });
          },
        ),
      ],
    );
  }
}
We also have access to IDE snippets for stateful widgets too. Just type in stful.
Constructors in stateful widgets are the same, but they are only declared in the DisplayCount widget and not the _DisplayCountState widget. In the _DisplayCountState widget where you will be putting your code, you can refer to the variable as (widget.[variable]).
class DisplayCount extends StatefulWidget {
  const DisplayCount({Key? key, required this.message}) : super(key: key);

  final String message;

  @override
  _DisplayCountState createState() => _DisplayCountState();
}

class _DisplayCountState extends State<DisplayCount> {
  ...
  @override
  Widget build(BuildContext context) {
    return Column(
      children: [
        // refer to the 'message' attribute defined above as widget.message
        Text(widget.message),
        ...
      ],
    );
  }
  ...
}
Stateful widgets are instantiated in the same way as Stateless widgets are.
Stateful widgets are very useful for dealing with anything related to business logic, interactive features, and listening to streams of data on the backend, as we’ll see later.
Null Safety
In recent versions of Flutter, null safety was introduced in order to greatly help developers in dealing with notorious null errors.
Essentially, if something like a String is declared and is supposed to be assigned a valid value like ‘Hi!’, in the case that it somehow is assigned a null value (basically, assigned a value of nothing), then all sorts of problems start to happen – some parts might start missing text, functionalities, etc.
Flutter’s null safety helps developers fix these issues by using powerful IDE features that force developers to be more strict with null checking. This means that developers have to account for the situations in which the variables they declare might take on null values.
In null safety, there are 3 important symbols to know about. The ‘?’ symbol, the ‘!’ symbol, and the ‘??’ symbol.
‘?’
If we declare a variable that we think might somehow take on a null value, we add the ‘?’ operator to the end of the type declaration to remind us and the IDE to include strict null checking on that variable. Here’s an example.
// initializing a string wih a nullable type and assigning it to the
// return value of this function, fetchSomeDataOrSomething()
String? response = await fetchSomeDataOrSomething();
// in the case that the function returned something null and response has a null value,
// it is now safely accounted for with this conditional statement
if (response != null) {
  print(response);
} else {
  print('error');
}
‘!’
If we declare a nullable type for a variable but we know for certain that it won’t be null, we use the ‘!’ operator at the end of the variable name. Note: try to avoid using this because it bypasses all the null safety checks performed by the IDE.
// fetchSomeData() returns type bool
bool? response = fetchSomeData();
// declaring that response will always be a valid value and not null
if (response! == True) {
  print('function has returned true');
} else {
  print('function has returned false');
}
‘??’
When we are assigning a value to a variable, we can check whether it is null or not and assign a value from there. If the value it is assigned is null, we can add the ‘??’ operator and add a default value on the right, in case it is null.
String? response = fetchSomething();
// if response is not null, the 'something' variable will take on the value of response'
// if response is null, the 'something' variable with take on the value on the right side
String something = response ?? 'defaultValue';
More Flutter Resources
Ok, so that was a lot! One helpful way to review all of these concepts and really see them in action in a real project is to watch Flutter App Builds on YouTube.
One particularly excellent channel that helped me a lot was Marcus Ng. His ‘Apps from Scratch’ series consists of him building user interfaces (evidently) from scratch, and he explains each one of his steps along the way. Check his channel out and take a look at the series!
- Flutter Travel UI Tutorial | Apps From Scratch
- Flutter Chat UI Tutorial | Apps From Scratch
- Flutter YouTube API and Video Player Tutorial | Apps From Scratch
Another great channel is The Flutter Way. The videos are ‘speed builds’ of him coding up extremely well designed and beautiful Flutter User Interfaces, and you can see how he adheres to certain conventions and good practices. I recommend you check his channel out and watch some of his app builds!
- Plant App – Flutter UI – Speed Code
- Online Shop App – Flutter UI – Speed Code
- COVID-19 App – Flutter UI – Speed Code
See the flutter_examples.dart file to see all the code snippets from this section of the tutorial (to use as reference).
Learning Firebase
Firebase is a platform for developing mobile and web applications. It is a convenient way to deal with backend or data without creating your own server or API.
Since Flutter was developed by Google and Firebase was also developed by Google (which was originally made for creating apps), Flutter and Firebase work very well with each other as frontend and backend tools.
The main backend of most projects will be using a database, which Firebase provides with its Cloud Firestore database. The basic structure of Firestore databases is quite simple, but is very different from conventional, realtime databases like with SQL. Instead, Firestore is a No-SQL database.
This series is extremely good on getting familiar with the structure of Firebase, so please take a look. Episodes 1, 2, and 4 are particularly important.
Essentially, a Firebase Firestore database is created by making top-level ‘collections’ which can be things like ‘Users’, ‘Messages’, ‘Products’, etc. These collections can have documents in them.
Documents are specific instances of its parent collection, which can be assigned a number of ‘fields’ with corresponding values. For example, here’s how the Macbook Pro document in the Products collection might look:
left side: collections, middle: documents of the collection, right: fields in this document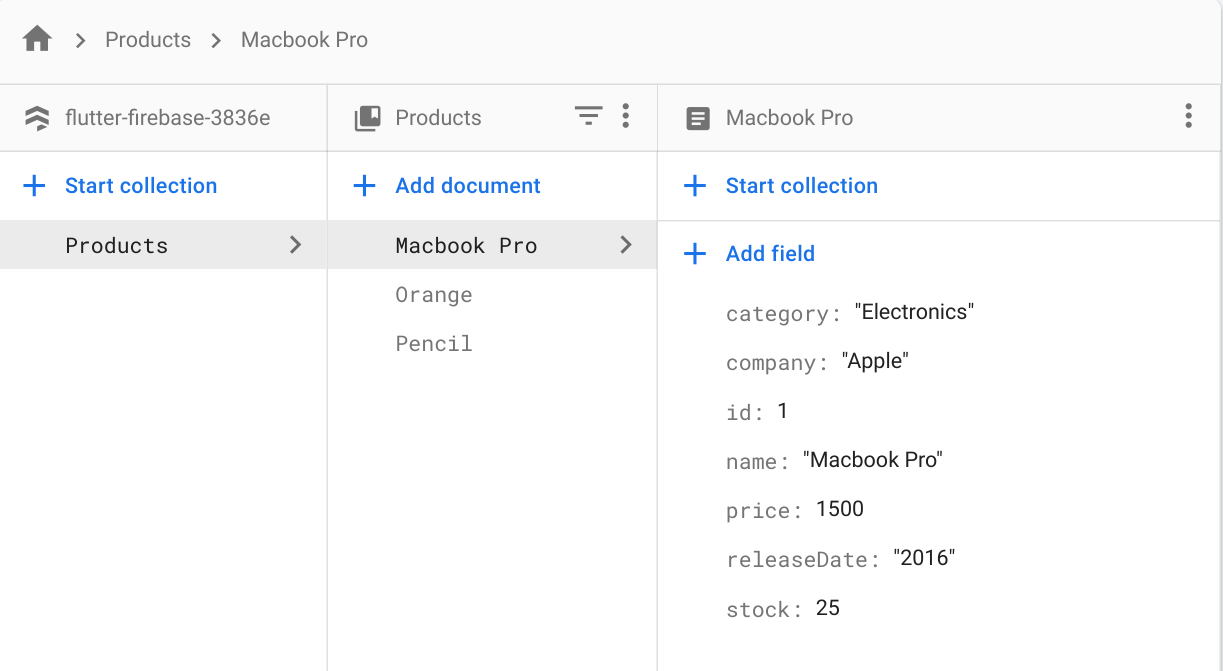
Note: I’m accessing a Cloud Firestore database through the Firebase Console on a dummy project I created
The thing about No-SQL databases is that you can create documents in the same collection without the same fields!! For example, the ‘Pencil’ document might be missing the ‘rating’ field, but there wouldn’t be any errors.
Some other important things to know about Firebase are billing and security rules.
Billing in Firestore is charged not by the size of the database, but by the number of reads and writes to the database. For example, if you create an Electronics product (in the form of a document) and you add it to the database, it counts as one write. If you wanted to update the price of the product, it would also count as 1 write.
If you needed to load all the ‘Food’ collection’s products, Firebase would charge you 1 read per every document in the collection.
However, Firebase is quite generous with its limits. But, if you would like to take your app to production (put it into the real world), it’s best to be wary of how billing works in order to optimize your database calls.
Check the Firebase pricing page to learn about the limits for the free tier.
More really good resources:
Connecting Firebase with Flutter
Now that we know about the most important part of Firebase (the Firestore database), how do we get access to that data in Flutter?
StreamBuilder
We can use a StreamBuilder for this purpose. A ‘Stream’ is essentially just a stream of data that we are constantly watching for changes in. One end of the stream is the Firestore database. The other end of the stream is our app.
Thus, when something changes in the Firestore database (say, a new product is added), that change goes down the data stream and gets noticed by our Flutter app. Once that change is noticed, the StreamBuilder widget rebuilds itself in order to incorporate that change (the new product now appears on our app).
Here’s the syntax:
StreamBuilder(
  // gets an instance of a Firestore database and retrieves 'snapshots' of the Macbook Pro document
  stream: FirebaseFirestore.instance.collection('Products').doc('Macbook Pro').snapshots(),
  // builder defines what will be built on the app using this 'snapshot' data (the stream data)
  // Firestore collections are of type QuerySnapshot
  // Firestore documents are of type DocumentSnapshot
  // Both are referred to as AsyncSnapshots because they are asynchronous snapshots
  builder: (BuildContext context, AsyncSnapshot<DocumentSnapshot> snapshot) {
    // check that there is data in the stream and that it has finished loading
    if (snapshot.hasData) {
      return Container(
        // snapshot.data gives you access to all the fields in the document
        // get the values of the fields by using square brackets and the
        // name of the field, like so
        child: Text(snapshot.data['name'])
      ),
    }, else {
      // if there's no data yet, show a loading sign
      return CircularProgressIndicator();
    }
  },
)
It might look complicated, but it really isn’t. On one side you are accessing a stream of data, whether it be a collection or document, and you are building a widget that has access to that data through the ‘snapshot’ variable. If there are any changes that the StreamBuilder detects on Firestore’s end, the widget will be rebuilt.
FutureBuilder
StreamBuilders are great, but what about if you didn’t need to listen to changes on Firestore’s end? What if you just wanted to retrieve some information, say the price of the Macbook, and be done with it (you might know that the values won’t change)?
We can do that with a FutureBuilder.
FutureBuilders take in an asynchronous function as a parameter, and a builder to build something once that function has finished executing (similar to the StreamBuilder). In our example, our asynchronous function or ‘future’ (as the FutureBuilder calls it) would be retrieving the price of the Macbook, and our builder would be the widgets displaying that price.
// defining an async function that returns an int
Future<int> retrieveMacbookPrice() async {
  // PS here's how to retrieve a single document from Firestore -
  // in our case, the Macbook document
  var document = await FirebaseFirestore.instance.collection('Products').doc('Macbook Pro').get();
  // The data you get back (the document and its fields) will be a dictionary that maps
  // keys (type String) to values (type dynamic)
  Map<String, dynamic> macbookData = document.data();

  int macbookPrice = macbookData['price'];
}

FutureBuilder(
  // builder will only build after this 'future' function is done executing
  future: retrieveMacbookPrice(),
  // the 'snapshot' here refers to what is returned from the future!
  builder: (BuildContext context, AsyncSnapshot<int> snapshot) {
    if (snapshot.hasData) {
      // data from the snapshot is accessed like so
      int price = snaphot.data['price']
      return Container(
        // convert int to string
        child: Text(price.toString()),
      );
    } else {
      // if there's no data yet, show a loading sign
      return CircularProgressIndicator();
    }
  }
)
Whew, That was a lot! But guess what… Now that you know about how Firebase, FutureBuilders, and StreamBuilders work, you are very far in your journey to creating robust apps in Flutter.
State management
State management is a very important concept in Flutter that goes like this:
Say you want to make an app that keeps track of your user’s profile and information. After they log in with their username and password, you want to display their username in every page of the app as a greeting (for example, to say ‘Hello, [name]!’). How would you do this? How do you pass around the user’s values of ‘username’ and ‘password’ throughout the whole app?
You could pass the username as a parameter for all the stateless and stateful widgets that make up the different pages. But in reality, you want something that holds that username value that you can access across all screens / pages.
This can be done using a ‘Provider’ widget, a built in state management solution.
A Provider is called a ‘Provider’ because it is a parent widget that ‘provides’ a value to pass down to the child widget, so that the child widget has access to everything from the value / entity. In our example, if we had a ‘Cart’ class that we wanted to access in child widgets, it would look something like this:
Provider(
  create: (context) => CartModel(),
  child: MyApp(),
)
Thus, in the MyApp child widget, we would have access to the CartModel and all of its methods and such. You can instantiate the CartModel class to access the data in two ways:
// 1st way
Provider.of<CartModel>(context).removeAllItems();

// 2nd way
// context.watch listens for changes in CartModel - if data changes, the parent will rebuild
// whatever is necessary
context.watch<CartModel>().removeAllItems();
// context.read returns CartModel / the model of interest without listening to changes in
// the data
context.read<CartModel>().removeAllItems();
This calls Provider to look at the model that is of type CartModel, and calls the method removeAllItems(). In the 2nd way, the object of type CartModel (whatever is between < >) is instantianted by parentheses -> context.read< >().
What if we wanted to access another piece of data that requires state management – say, the user’s preferences for their color theme in the app? We could create a class called ‘UserPreferences’, but how would we have access to it on top of the CartModel class?
One way to do it would be to nest Providers.
Provider(
  create: (context) => CartModel(),
  child: Provider(
    create: (context) => UserPreferences(),
    child: MyApp(),
  ),
)
So we would have access to both the UserPreferences model and CartModel in MyApp. But you can probably tell that this gets unwieldly, fast, right? That’s where MultiProvider comes into play.
The ‘MultiProvider’ widget allows us to define multiple ‘providers’ at the very top of the app (main.dart), where ALL the child widgets have access to each of the providers.
MultiProvider(
  providers: [
    Provider<CartModel>(create: (_) => CartModel()),
    Provider<UserPreferences>(create: (_) => UserPreferences()),
  ],
  child: MyApp(),
)
What a natural progression!
That’s the basics of state management. Take a look at the extra resources listed below to get more familiar with these concepts and syntax. Also, take a look at the advanced_flutter_examples.dart file in the ‘code’ folder to see all of the examples provided in this section of the tutorial (to use as reference).
Best Practices
Best Practices are always important to keep in mind when developing any large projects in Flutter.
Folder Structure
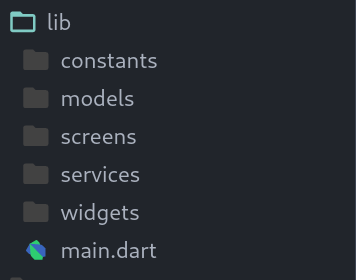
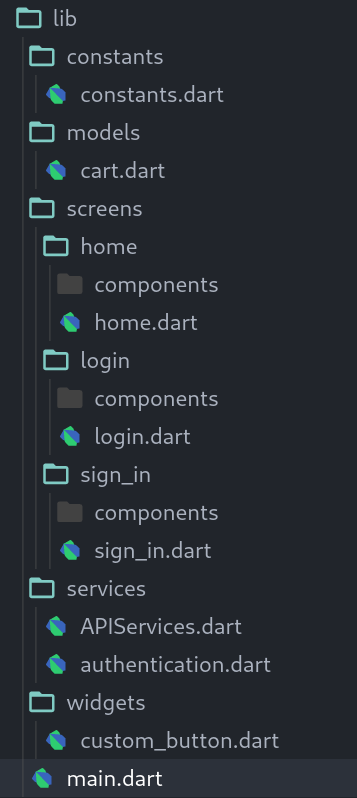
To maintain a large project, make sure your folder structure is correctly organized.
Here’s how folders are usually structured:
As we saw before, lib is where you will put all your flutter code. Flutter then converts its code into android and ios code to make native apps, which can be found in the android and ios folders. Any images, svgs, or pictures you use should be placed in an ‘assets’ folder, which you have to create.
In the lib folder, you should split code up into screens, models, services, widgets, and constants. Main.dart will be your wrapper file.
Constants is used for placing constants.dart, which usually defines ThemeData and color schemes for your app, to make it easier for your app to conform to a certain style. For example, I usually define kPrimaryColor and kSecondaryColor in the constants.dart file. You can also use a theme.dart file to create ThemeData objects.
Models are the classes you want to create to make it easier to work with data in Flutter. For example, you might want to create a User class that has properties of ‘username’, ‘nickname’, ‘age’, etc. In the models folder, create and name your file based on what you would like your class to be called. If I wanted to make…
class User {
  String username;
  String nickname;
  int age;
}
Then I would name the file user.dart (if it is two words, simply use an underscore instead of a space -> food_item.dart).
Screens is the folder where you will place most of your code – the UI code for all of your screens. To create a new screen, create a folder and name it the screen, and place your code in that subfolder. This way, all your screens will be different folders in the ‘screens’ folder. In your specific screen folder, name the main file (name_of_screen).dart.
If your screen has many components to it, create a components folder in the screen’s directory.
Services is used for putting all the classes that contain any business logic. These follow the same folder conventions as the models folder.
Widgets is used for putting all widgets you custom created that you use for multiple screens. For example, if you created your own Button widget that you want to use on both the login and sign_in screens, just put that Button file into the widgets folder.
Separate Business Logic from Frontend
Business logic is essentially any code that doesn’t directly have to do with the layout of the app. For example, if you had a login screen, the UI would be the Column, TextField, and ElevatedButton widgets. The business logic would be how the user would sign in to the backend server you are using (for example, Firebase).
It is generally a good idea to keep these separated so you don’t mix backend / dealing with data and frontend, which can lead to messy and confusing code. If I wanted to look into the code for the product_details screen, why would I want to see how the product is dealt with on the backend? It’s cleaner to separate the two paradigms.
What this means for us is that we should place as much of the business logic / backend code in the ‘services’ folder as we can, and not in the ‘screens’ folder. I usually do this by defining an ‘APIServices’ class that has a number of methods that deals with the business logic.
Abstract as much as possible (make more widgets)
In Flutter, it is in your best interest to extract as much code as you can. What this means is that whenever you have a part of the widget tree that is dedicated to a single use case, extract it into its own widget and put it somewhere else. Here’s an example.
// products_screen.dart

Scaffold(
  // Column widget to lay out everything on the page vertically
  body: Column(
    children: [
      // nested column widget dedicated to displaying electronics
      Column(
        children: [
          Container(child: Text('Electronics')),
          Text('Macbook pro'),
          Text('iPhone'),
          Text('Galaxy Buds'),
        ],
      ),
      // nested column widget dedicated to displaying food
      Column(
        children: [
          Container(child: Text('Food items')),
          Text('Jelly beans'),
          Text('Peanut Butter'),
          Text('Apples'),
        ],
      ),
    ],
  ),
)
This would be putting the ‘Food items’ section and ‘Electronics’ section into a single widget tree, which gets messy and confusing if the project grows bigger. As best practices, here’s what it would look like instead.
// screens/products/products_screen.dart

Scaffold(
  body: Column(
    children: [
      // Extracted widgets (put the widgets into their own file in the 'components' directory of this screen's directory)
      ElectronicsSection(),
      FoodItemsSection(),
    ],
  ),
)

// screens/products/components/electronics_section.dart

class ElectronicsSection extends StatelessWidget {
  const ElectronicsSection({ Key? key }) : super(key: key);

  // same widgets, just put into the build function as a returned value
  @override
  Widget build(BuildContext context) {
    return Column(
      children: [
        Container(child: Text('Electronics')),
        Text('Macbook pro'),
        Text('iPhone'),
        Text('Galaxy Buds'),
      ],
    );
  }
}


// screens/products/components/food_items_section.dart

class FoodItemsSection extends StatelessWidget {
  const FoodItemsSection({ Key? key }) : super(key: key);

  // same widgets, just put into the build function as a returned value
  @override
  Widget build(BuildContext context) {
    return Column(
      children: [
        Container(child: Text('Food items')),
        Text('Jelly beans'),
        Text('Peanut Butter'),
        Text('Apples'),
      ],
    );
  }
}
The result is much cleaner and much easier to debug and code with.
Testing
Creating unit tests for your Flutter app are a very convenient way to make sure adding new features doesn’t break your code.
Tests are written to automate the process of checking certain functionalities in your app. For example, you can write a unit test to make sure the login screen and business logic is working correctly, which you might run everytime you make changes to other parts of your app.
Take a look at these resources to learn about testing in flutter.
Challenge Project
Now that you know the basic syntax of Flutter and how it works, you need to put this knowledge into practice! I recommend first following along with Flutter App Build tutorials (provided above to see just how advanced coders develop apps, and then try to code an app with only UI components by yourself (you can look on dribbble for ui inspiration).
To help you out a bit, I’ve picked a dribbble post you can try to implement in a Flutter app on your own.
This is a dribbble post created by Risang Kuncoro that consists of 2 screens of a travel app. The challenge is to (almost) perfectly recreate this app on a Flutter project of your own.
For all the information on the page, it is okay if you hard code it into your application, but feel free to try to create simple business logic (i.e. creating models for each location) as an added challenge.
Hint: among other things, you’ll have to utilize…
- the Stack widget
- the Icon widget
- the AssetImage widget
- for building a navigation bar -> bottomNavigationBar: BottomNavigationBar(…)
- for navigating to another page -> Navigator.push(context, MaterialPageRoute(…))
- and more!
If you have any problems along the way, remember that Google, Stack Overflow, and the Flutter docs are your best friend!
Helpful Resources
Now that you’ve learned the syntax and tried to implement a Flutter project by yourself, I wish you luck in your endeavors to create your own create, Flutter apps!
To help you along the rest of your journey, here is a list of all the compiled resources, ordered from more beginner-friendly to more advanced.
Dart
Flutter
- Flutter Crash Course for Beginners 2021 – Build a Flutter App with Google’s Flutter & Dart
- Flutter Tutorial for Beginners
- Flutter Crash Course
Flutter App Tutorials
- Flutter Course – Full Tutorial for Beginners (Build iOS and Android Apps)
- Flutter Chat UI Tutorial | Apps from Scratch
- Flutter App with Firebase Authentication and Firestore Tutorial – Crypto Wallet
- Plant App – Flutter UI – Speed Code
Firebase
- Flutter & Firebase App Build
- YouTube – Get to know Cloud Firestore
- Flutter Firebase Authentication – The Clean Way
State management
- Flutter Docs – Simple app state management
- Stream Builder in Flutter
- Making sense of all those Flutter Providers
- Flutter Provider – Advanced Firebase Data Management
If this feels a little bit overwhelming, don’t feel discouraged. Many times I was stuck, but once I understood a new concept I quickly made tons of progress. It’s never too late. Be glad that you are here in the first place!
I hope you enjoyed this comprehensive guide!