Stager
Stager is a Flutter development tool that allows you to run small portions of your app as independent Flutter apps. This lets you:
- Focus your development on a single widget or flow – no more clicking through multiple screens or setting external feature flags to reach the page you’re working on.
- Ensure your UI works in wide number of cases, including:
- Light and Dark mode
- Small or large text sizes
- Different viewport sizes
- Different device types
- Loading, empty, error, and normal states
- Show all of this to your designers to make sure your app is pixel-perfect.
Demo
The example included in this repo demonstrates how Stager can be used in the context of a simple Twitter-like app that displays a feed of posts and includes detail pages for posts and users.
Stager uses Scenes (see the Concepts section below) that you define to generate small Flutter apps. To run the Stager apps included in the example, start by moving to the example directory and fetching the app’s dependencies:
cd example
flutter pub get
NOTE: The Stager main files for the example have already been generated. To generate a Stager main file from files containins Scenes, run flutter run build_runner from your app’s home folder.
You can then run the indivdual Stager apps with the following commands:
Posts List
flutter run -t lib/pages/posts_list/posts_list_page_scenes.stager_app.g.dart
User Detail
flutter run -t lib/pages/user_detail/user_detail_page_scenes.stager_app.g.dart
Post Detail
flutter run -t lib/pages/post_detail/post_detail_page_scenes.stager_app.g.dart
To get an idea of how these Scenes fit together, you can also run the main app by executing flutter run from the example directory, which runs the default main.dart.
Concepts
Scene
A Scene is a simple, self-contained unit of UI, and is the most important idea in Stager. Scenes make it easy to focus on a single widget or page to greatly increase development velocity by isolating it from the rest of your app. This isolation makes it much easier to provide your UI with a wide variety of inputs and to swap out dependencies with mocks or alternate implementations.
To create your own Scene, simply create a Scene subclass and implement title, the name of your Scene, and build(), which constructs body of the Scene.
You can also override the following methods and properties:
setUp
A function that is called once before the Scene is displayed. This will generally be where you configure your widget’s dependencies.
environmentControls
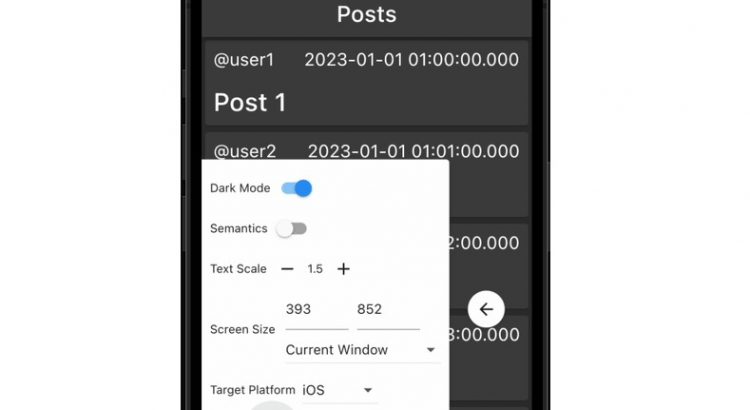
An optional list of EnvironmentControls that allow you to add custom widgets to the Stager control panel. An EnvironmentControl provides a widget that allows the user to change values used when presenting a Scene. State is preserved when the same controls are used in multiple scenes. Stager includes several of these controls that allow the user to toggle dark mode, change text scale, etc.
These are useful if you want to manipulate things specific to your app, including:
- Data displayed by your widget
- Properties on mocked dependenices
- Feature flags
StagerApp
A StagerApp displays a list of Scenes, allow the user to select from all available Scenes. Because Scenes can contain their own Navigators, the StagerApp overlays a back button on top of the Scenes.
You will generally not need to interact with this class directly – Stager will generate this for you. Once you’ve written your Scene classes, simply run flutter run build_runner from your project root to generate a file containing a main() entrypoint that creates a StagerApp with your Scenes.
Use
Imagine you have the following widget buried deep in your application:
/// A [ListView] of [PostCard]s
class PostsList extends StatefulWidget {
  /// Creates a [PostsList] displaying [posts].
  ///
  /// [postsFuture] will be set to the value of [posts].
  PostsList({
    Key? key,
    required List<Post> posts,
  }) : this.fromFuture(key: key, Future<List<Post>>.value(posts));

  /// Creates a [PostsList] with a Future that resolves to a list of [Post]s.
  const PostsList.fromFuture(this.postsFuture, {super.key});

  /// The Future that resolves to the list of [Post]s this widget will display.
  final Future<List<Post>> postsFuture;

  @override
  State<PostsList> createState() => _PostsListState();
}

class _PostsListState extends State<PostsList> {
  @override
  Widget build(BuildContext context) {
    return FutureBuilder<List<Post>>(
      future: widget.postsFuture,
      builder: (BuildContext context, AsyncSnapshot<List<Post>> snapshot) {
        if (snapshot.connectionState == ConnectionState.waiting) {
          return const Center(
            child: CircularProgressIndicator(),
          );
        }

        if (snapshot.hasError) {
          return const Center(
            child: Text('Error'),
          );
        }

        final List<Post>? posts = snapshot.data;
        if (posts == null || posts.isEmpty) {
          return const Center(
            child: Text('No posts'),
          );
        }

        return ListView.builder(
          itemBuilder: (BuildContext context, int index) => PostCard(
            post: posts[index],
            onTap: () {
              Navigator.of(context).push(
                MaterialPageRoute<void>(
                  builder: (BuildContext context) => PostDetailPage(
                    post: posts[index],
                  ),
                ),
              );
            },
          ),
          itemCount: posts.length,
        );
      },
    );
  }
}
Normally, exercising all states in this widget would involve:
- Building and launching the full app.
- Navigating to this page.
- Editing the code to force display of the states we want to exercise, either by constructing a fake
Future<List<Post>>or commenting out the various conditional checks in the FutureBuilder’sbuilderfunction.
Scenes present a better way to do this.
Making a Scene
We can create a Scene for each state we want to show. For example, a Scene showing the PostsListPage’s empty state might look something like:
@GenerateMocks(<Type>[Api])
import 'posts_list_page_scenes.mocks.dart';

/// Defines a shared build method used by subclasses and a [MockApi] subclasses
/// can use to control the behavior of the [PostsListPage].
abstract class BasePostsListScene extends Scene {
  /// A mock dependency of [PostsListPage]. Mock the value of [Api.fetchPosts]
  /// to put the staged [PostsListPage] into different states.
  late MockApi mockApi;

  @override
  Widget build() {
    return EnvironmentAwareApp(
      home: Provider<Api>.value(
        value: mockApi,
        child: const PostsListPage(),
      ),
    );
  }

  @override
  Future<void> setUp() async {
    mockApi = MockApi();
  }
}

/// A Scene showing the [PostsListPage] with no [Post]s.
class EmptyListScene extends BasePostsListScene {
  @override
  String get title => 'Empty List';

  @override
  Future<void> setUp() async {
    await super.setUp();
    when(mockApi.fetchPosts()).thenAnswer((_) async => <Post>[]);
  }
}
Running a StagerApp
Once you have created a Scene subclass, generate your StagerApp:
flutter pub run build_runner build --delete-conflicting-outputs
This will generate a my_scenes.stager_app.g.dart file (if you named the file containing your Scenes my_scenes.dart), which contains a main function that creates your Scenes and launches a StagerApp. For the EmptyListScene we defined above, it would look something like:
// GENERATED CODE - DO NOT MODIFY BY HAND

// **************************************************************************
// StagerAppGenerator
// **************************************************************************

import 'package:stager/stager.dart';

import 'posts_list_page_scenes.dart';

void main() {
  final List<Scene> scenes = <Scene>[
    EmptyListScene(),
  ];

  if (const String.fromEnvironment('Scene').isNotEmpty) {
    const String sceneName = String.fromEnvironment('Scene');
    final Scene scene =
        scenes.firstWhere((Scene scene) => scene.title == sceneName);
    runStagerApp(scenes: <Scene>[scene]);
  } else {
    runStagerApp(scenes: scenes);
  }
}
You can launch this app directly from VS Code, or by running:
flutter run -t path/to/my_scenes.stager_app.g.dart
If your Stager app consists of multiple Scenes, you can launch to a specific scene by providing the name of the scene as an argument:
flutter run -t path/to/my_scenes.stager_app.g.dart --dart-define='Scene=No Posts'
Adding your own environment controls
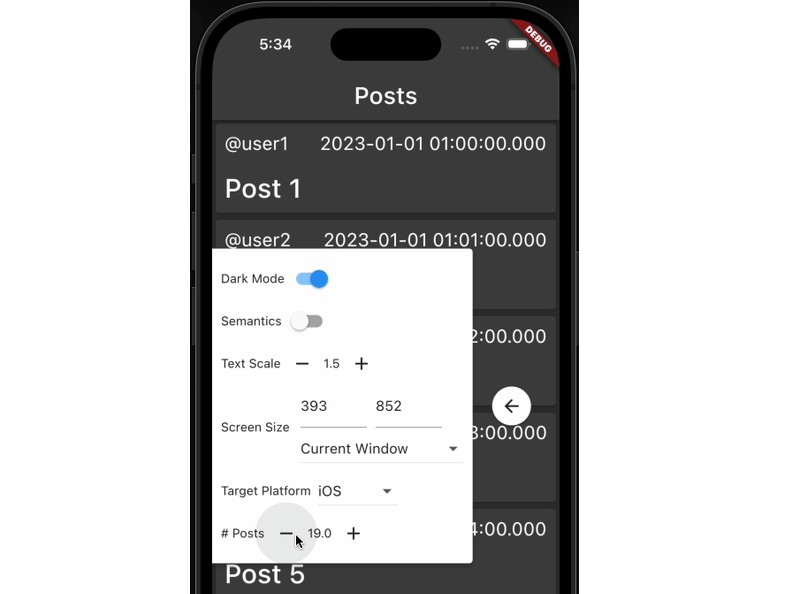
Stager’s control panel comes with a generally useful set of controls that enable you to toggle dark mode, adjust text scale, etc. However, it is very likely that your app has unique environment properties that would be useful to adjust at runtime. To support this, Scenes have an overridable environmentControls property which allows you to add custom widgets to the default set of environment manipulation controls.
A very simple example:
class CounterScene extends Scene {
  // A [StepperControl] allows the user to increment and decrement a value using "-" and
  // "+" buttons. [EnvironmentControl]s will trigger a Scene rebuild when they update
  // their values.
  final StepperControl<int> stepperControl = StepperControl<int>(
    title: 'My Control',
    stateKey: 'MyControl.Key',
    defaultValue: 0,
    onDecrementPressed: (int currentValue) => currentValue + 1,
    onIncrementPressed: (int currentValue) => currentValue - 1,
  );

  @override
  String get title => 'Counter';

  @override
  final List<EnvironmentControl<Object?>> environmentControls =
      <EnvironmentControl<Object?>>[
        stepperControl,
  ];

  @override
  Widget build() {
    return EnvironmentAwareApp(
      home: Scaffold(
        body: Center(
          child: Text(stepperControl.currentValue.toString()),
        ),
      ),
    );
 }
}
More complex examples can be found in WithPostsScene in example/lib/pages/posts_list/posts_list_page_scenes.dart and PostDetailPageScene in example/lib/pages/post_detail/post_detail_page_scenes.dart.
Testing
You may notice that these names are very similar to Flutter testing functions. This is intentional – Scenes are very easy to reuse in tests. Writing Scenes for your widgets can be a great way to start writing widget tests or to expand your widget test coverage. A widget test using a Scene can be as simple as this:
testWidgets('shows an empty state', (WidgetTester tester) async {
  final Scene scene = EmptyListScene();
  await scene.setUp();
  await tester.pumpWidget(scene.build());
  await tester.pump();
  expect(find.text('No posts'), findsOneWidget);
});