
A starter game in Flutter with all the bells and whistles
of a mobile (iOS & Android) game including the following features:
- sound
- music
- main menu screen
- settings
- ads (AdMob)
- in-app purchases
- games services (Game Center & Google Play Games Services)
- crash reporting (Firebase Crashlytics)
Getting started
The game compiles and works out of the box. It comes with things
like a main menu, a router, a settings screen, and audio.
When building a new game, this is likely everything you first need.
When you’re ready to enable more advanced integrations, like ads
and in-app payments, read the Integrations section below.
Development
To run the app in debug mode:
flutter run
This assumes you have an Android emulator,
iOS Simulator, or an attached physical device.
It is often convenient to develop your game as a desktop app.
For example, you can run flutter run -d macOS, and get the same UI
in a desktop window on a Mac. That way, you don’t need to use a
simulator/emulator or attach a mobile device. This template supports
desktop development by disabling integrations like AdMob for desktop.
Code organization
Code is organized in a loose and shallow feature-first fashion.
In lib/src, you’ll therefore find directories such as ads, audio
or main_menu. Nothing fancy, but usable.
lib
├── src
│   ├── ads
│   ├── app_lifecycle
│   ├── audio
│   ├── crashlytics
│   ├── game_internals
│   ├── games_services
│   ├── in_app_purchase
│   ├── level_selection
│   ├── main_menu
│   ├── play_session
│   ├── player_progress
│   ├── settings
│   ├── style
│   └── win_game
├── ...
└── main.dart
The state management approach is intentionally low-level. That way, it’s easy to
take this project and run with it, without having to learn new paradigms, or having
to remember to run flutter pub run build_runner watch. You are,
of course, encouraged to use whatever paradigm, helper package or code generation
scheme that you prefer.
Building for production
To build the app for iOS (and open Xcode when finished):
flutter build ipa && open build/ios/archive/Runner.xcarchive
To build the app for Android (and open the folder with the bundle when finished):
flutter build appbundle && open build/app/outputs/bundle/release
While the template is meant for mobile games, you can also publish
for the web. This might be useful for web-based demos, for example,
or for rapid play-testing. The following command requires installing
peanut.
flutter pub global run peanut
--web-renderer canvaskit
--extra-args "--base-href=/name_of_your_github_repo/"
&& git push origin --set-upstream gh-pages
The last line of the command above automatically pushes
your newly built web game to GitHub pages, assuming that you have
that set up.
Integrations
The more advanced integrations are disabled by default. For example,
achievements aren’t enabled at first because you, the developer,
have to set them up (the achievements need to exist in App Store Connect
and Google Play Console before they can be used in the code).
This section includes instructions on how to enable
any given integration.
Some general notes:
- Change the package name of your game
before you start any of the deeper integrations.
StackOverflow has instructions
for this, and therenametool
(on pub.dev) automates the process. - The guides below all assume you already have your game
registered in Google Play Console and in Apple’s
App Store Connect.
Ads
Ads are implemented using the official google_mobile_ads package
and are disabled by default.
// TODO: When ready, uncomment the following lines to enable integrations.

AdsController? adsController;
// if (!kIsWeb && (Platform.isIOS || Platform.isAndroid)) {
//   /// Prepare the google_mobile_ads plugin so that the first ad loads
//   /// faster. This can be done later or with a delay if startup
//   /// experience suffers.
//   adsController = AdsController(MobileAds.instance);
//   adsController.initialize();
// }
The AdsController code inlib/main.dart is null by default,
so the template gracefully falls back to not showing ads
on desktop.
You can find the code relating to ads in lib/src/ads/.
To enable ads in your game:
-
Go to AdMob and set up an account.
This could take a significant amount of time because you need to provide
banking information, sign contracts, and so on. -
Create two Apps in AdMob: one for Android and one for iOS.
-
Get the AdMob App IDs for both the Android app and the iOS app.
You can find these in the App settings section. They look
something likeca-app-pub-1234567890123456~1234567890
(note the tilde between the two numbers). -
Open
android/app/src/main/AndroidManifest.xml, find the<meta-data>
entry calledcom.google.android.gms.ads.APPLICATION_ID,
and update the value with the App ID of the Android AdMob app
that you obtained in the previous step.<meta-data android:name="com.google.android.gms.ads.APPLICATION_ID" android:value="ca-app-pub-1234567890123456~1234567890"/>
-
Open
ios/Runner/Info.plist, find the
entry calledGADApplicationIdentifier,
and update the value with the App ID of the iOS AdMob app.<key>GADApplicationIdentifier</key> <string>ca-app-pub-1234567890123456~0987654321</string>
-
Back in AdMob, create an Ad unit for each of the AdMob apps.
This asks for the Ad unit’s format (Banner, Interstitial, Rewarded).
The template is set up for a Banner ad unit, so select that if you
want to avoid making changes to the code inlib/src/ads. -
Get the Ad unit IDs for both the Android app and the iOS app.
You can find these in the Ad units section. They look
something likeca-app-pub-1234567890123456/1234567890
(yes, the format is very similar to App ID; note the slash
between the two numbers). -
Open
lib/src/ads/ads_controller.dartand update the values
of the Ad unit IDs there.final adUnitId = defaultTargetPlatform == TargetPlatform.android ? 'ca-app-pub-1234567890123456/1234567890' : 'ca-app-pub-1234567890123456/0987654321';
-
Uncomment the code relating to ads in
lib/main.dart,
and add the following two imports:import 'dart:io'; import 'package:google_mobile_ads/google_mobile_ads.dart';
-
Register your test devices
in AdMob‘s Settings → Test devices section.
The game template defines a sample AdMob app ID and two sample _Ad unit ID_s.
These allow you to test your code without getting real
IDs from AdMob, but this “feature” is sparsely documented and only meant
for hello world projects.
The sample IDs won’t work for published games.
If you feel lost at any point, a full AdMob for Flutter walk-through
is available on Google AdMob’s documentation site.
If you want to implement more AdMob formats (such as Interstitial ads),
a good place to start are the examples in
package:google_mobile_ads.
Audio
Audio is enabled by default and ready to go. You can modify code
in lib/src/audio/ to your liking.
You can find some music
tracks in assets/music — these are Creative Commons Attribution (CC-BY)
licensed, and are included in this repository with permission. If you decide
to keep these tracks in your game, please don’t forget to give credit
to the musician, Mr Smith.
The repository also includes a few sound effect samples in assets/sfx.
These are public domain (CC0) and you will almost surely want to replace
them because they’re just recordings of a developer doing silly sounds
with their mouth.
Crashlytics
Crashlytics integration is disabled by default. But even if you don’t
enable it, you might find code in lib/src/crashlytics helpful.
It gathers all log messages and errors, so that you can, at the very least,
print them to the console.
When enabled, this integration is a lot more powerful:
- Any crashes of your app are sent to the Firebase Crashlytics console.
- Any uncaught exception thrown anywhere in your code is captured
and sent to the Firebase Crashlytics console. - Each of these reports includes the following information:
- Error message
- Stack trace
- Device model, orientation, RAM free, disk free
- Operating system version
- App version
- In addition, log messages generated anywhere in your app
(and from packages you use) are recorded in memory,
and are sent alongside the reports. This means that you can
learn what happened before the crash or exception
occurred. - Also, any generated log message with
Level.severeor above
is also sent to Crashlytics. - You can customize these behaviors in
lib/src/crashlytics.
To enable Firebase Crashlytics, do the following:
- Create a new project in
console.firebase.google.com.
Call the Firebase project whatever you like; just remember the name.
You don’t need to enable Analytics in the project if you don’t want to. - Install
firebase-tools
on your machine. - Install
flutterfireCLI
on your machine. - In the root of this project (the directory containing
pubspec.yaml),
run the following:flutterfire configure- This command asks you for the name of the Firebase project
that you created earlier, and the list of target platforms you support.
As of April 2022, onlyandroidandiosare fully
supported by Crashlytics. - The command rewrites
lib/firebase_options.dartwith
the correct code.
- This command asks you for the name of the Firebase project
- Go to
lib/main.dartand uncomment the lines that relate to Crashlytics.
You should now be able to see crashes, errors, and
severe log messages in
console.firebase.google.com.
To test, add a button to your project, and throw whatever
exception you like when the player presses it.
TextButton(
  onPressed: () => throw StateError('whoa!'),
  child: Text('Test Crashlytics'),
)
Games Services (Game Center & Play Games Services)
Games Services (like achievements and leaderboards) are implemented by the
games_services package,
and are disabled by default.
To enable games services, first set up Game Center on iOS
and Google Play Games Services on Android.
To enable Game Center (GameKit) on iOS:
- Open your Flutter project in Xcode (
open ios/Runner.xcodeproj). - Select the root Runner project and go to the Signing & Capabilities tab.
- Click the
+button to add Game Center as a capability.
You can close Xcode now. - Go to your app in App Store Connect and set up Game Center
in the Features section. For example, you might want to set up
a leaderboard and several achievements.
Take note of the IDs of the leaderboards and achievements you create.
To enable Play Games Services on Android:
-
Go to your app in Google Play Console.
-
Select Play Games Services → Setup and management →
Configuration from the navigation menu and follow their instructions.- This takes a significant amount of time and patience.
Among other things, you’ll need to set up an OAuth consent
screen in Google Cloud Console.
If at any point you feel lost,
consult the official Play Games Services guide.
- This takes a significant amount of time and patience.
-
When done, you can start adding leaderboards and achievements
in Play Games Services → Setup and management.
Create the exact same set as you did on the iOS side.
Make note of IDs. -
Go to Play Games Services → Setup and management →
Publishing, and click ‘Publish’. Don’t worry, this doesn’t
actually publish your game. It only publishes the achievements
and leaderboard. Once a leaderboard, for example, is published
this way, it cannot be unpublished. -
Go to Play Games Services →
Setup and management → Configuration →
Credentials. Find a button that says ‘Get resources’.
You get an XML file with the Play Games Services IDs.// TODO: When ready, change both these leaderboard IDs. iOSLeaderboardID: "some_id_from_app_store", androidLeaderboardID: "sOmE_iD_fRoM_gPlAy",
-
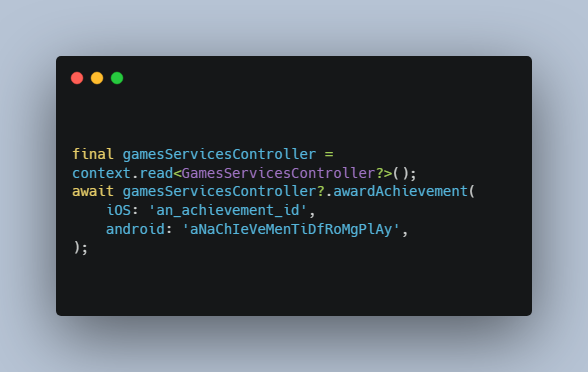
The
awardAchievement()function in the same file takes the IDs
as arguments. You can therefore call it from anywhere
in your game like this:final gamesServicesController = context.read<GamesServicesController?>(); await gamesServicesController?.awardAchievement( iOS: 'an_achievement_id', android: 'aNaChIeVeMenTiDfRoMgPlAy', );
You might want to attach the achievement IDs to levels, enemies,
places, items, and so on. For example, the template has levels
defined inlib/src/level_selection/levels.dartlike so:GameLevel( number: 1, difficulty: 5, achievementIdIOS: 'first_win', achievementIdAndroid: 'sOmEtHinG', ),
That way, after the player reaches a level, we check if the level
has non-null achievement IDs, and if so, we callawardAchievement()
with those IDs. -
Uncomment the code relating to games services in
lib/main.dart.// TODO: When ready, uncomment the following lines. GamesServicesController? gamesServicesController; // if (!kIsWeb && (Platform.isIOS || Platform.isAndroid)) { // gamesServicesController = GamesServicesController() // // Attempt to log the player in. // ..initialize(); // }
If at any point you feel lost, there’s a How To guide written by the author
of package:games_services. Some of the guide’s instructions and screenshots
are slightly outdated (for example, iTunes Connect has been renamed to App Store Connect
after the article was published) but it’s still an excellent resource.
In-app purchases
In-app purchases are implemented using the official
in_app_purchase package.
The integration is disabled by default.
To enable in-app purchases on Android:
- Upload the game to Google Play Console,
to the Closed Testing track.- Since the game already
depends onpackage:in_app_purchase, it signals itself to the
Play Store as a project with in-app purchases. - Releasing to Closed Testing triggers a review process,
which is a prerequisite for in-app purchases to work.
The review process can take several days and until it’s complete,
you can’t move on with the Android side of things.
- Since the game already
- Add an in-app product in Play Console → Monetize →
In-app products. Come up with a product ID (for example,
ad_removal). - While still in Play Console, activate the in-app product.
To enable in-app purchases on iOS:
- Make sure you have signed the Paid Apps Agreement
in App Store Connect. - While still in App Store Connect, go to Features →
In-App Purchases, and add a new in-app purchase
by clicking the+button.
Use the same product ID you used on the Android side. - Follow instructions on how to get the in-app purchase approved.
Now everything is ready to enable the integration in your Dart code:
-
Open
lib/src/in_app_purchase/ad_removal.dartand changeproductId
to the product ID you entered in Play Console and App Store Connect./// The representation of this product on the stores. static const productId = 'remove_ads';
- If your in-app purchase is not an ad removal, then create a class
similar to the template’sAdRemovalPurchase. - If you created several in-app purchases, you need to modify
the code inlib/src/in_app_purchase/in_app_purchase.dart.
By default, the template only supports one in-app purchase.
- If your in-app purchase is not an ad removal, then create a class
-
Uncomment the code relating to in-app purchases in
lib/main.dart.// TODO: When ready, uncomment the following lines. InAppPurchaseController? inAppPurchaseController; // if (!kIsWeb && (Platform.isIOS || Platform.isAndroid)) { // inAppPurchaseController = InAppPurchaseController(InAppPurchase.instance) // // Subscribing to [InAppPurchase.instance.purchaseStream] as soon // // as possible in order not to miss any updates. // ..subscribe(); // // Ask the store what the player has bought already. // inAppPurchaseController.restorePurchases(); // }
If at any point you feel lost, check out the official
Adding in-app purchases to your Flutter app
codelab.
Settings
The settings page is enabled by default, and accessible both
from the main menu and the “gear” button in the play session screen.
Settings are saved to local storage using the package:shared_preferences.
To change what preferences are saved and how, edit files in
lib/src/settings/persistence.
abstract class SettingsPersistence {
  Future<bool> getMusicOn();

  Future<bool> getMuted({required bool defaultValue});

  Future<String> getPlayerName();

  Future<bool> getSoundsOn();

  Future<void> saveMusicOn(bool value);

  Future<void> saveMuted(bool value);

  Future<void> savePlayerName(String value);

  Future<void> saveSoundsOn(bool value);
}
Icon
To update the launcher icon, first change the files
assets/icon-adaptive-foreground.png and assets/icon.png.
Then, run the following:
flutter pub run flutter_launcher_icons:main
You can configure
the look of the icon in the flutter_icons: section of pubspec.yaml.